skip to main |
skip to sidebar
 I haven’t posted anything for quite awhile so I guess it’s about time huh? I recently ordered a book that I was really excited about and I think you'll be very pleased with also. The name of the book is On Camera Flash – Techniques for Digital Wedding and Portrait Photography, written by a fellow blogger and pro photographer from the New Jersey area, Neil van Niekerk. I have a few select blogs and websites I frequent regularly and Neil’s (Tangents) is one of those.
I’m a fan of anything to do with off camera flash and I’m always reading up on it. What I like about Neil’s work is that he teaches you that when done properly, you rarely ever know flash was involved in the shot. I consider myself an amateur at photography and really don’t get enough time to go out and take photos, so I need all the short-cuts I can get. My aim, and yours should be also, is to get the best shot your equipment is capable of getting. These days I’m using a lot more fill-flash and a good technique I’ve learned is to try to balance the ambient with my flash for more pleasing photos. A lot of people say they only shoot with natural light, but I’m a firm believer that when balanced correctly, flash is no longer your enemy.
When composing photos I usually have a pretty good idea of what I’m looking for, but most of the time, my problem is that I have to think the shot out step by step which can be time consuming. Some times the shot your trying to get has to be a quick grab-shot, and what I’m trying to do is to get it to be more intuitive. Neil’s book will definitely help.
What I like about Neil’s style is he does not get too technical. I don’t need all the mumbo-jumbo geek talk; I just want to know how to get the shot. His book is almost like classroom training. He explains some things that need explaining like flash modes (manual, auto, TTL) and when and why to use each of them. The book also has five chapters on techniques about using various flash modifiers and diffusers, using bounce flash and when to use gels to help you to get the natural look. Neil also explains using flash outdoors both as a main light and as a fill light. He goes over his idea of when to use direct flash and when to bounce and explains how to control the ambient light with flash. In the last couple chapters he goes into off camera wireless TTL flash and off camera manual flash.
The book, On-Camera Flash, is loaded with many full color photographs with detailed explanations and tips. This is one of those books I’ll definitely keep in my “must have” collection. The book lists for $35.00 and if you use Amazon links to the left you’ll save about $10.00. I know you’ll love the book, and remember to keep shooting and have some fun!
 A couple months ago I wrote a post on what I thought were three great photography books to read if you were just starting out or wanted to learn some useful techniques. In that post I stated that I was waiting on a particular book, The Digital Photography Book Volume 3 by Scott Kelby. Actually, Volumes 1 and Volume 2 of that series were on my list and Volume 3 follows up where those first two books leave off. I was actually on a pre-order list waiting for my copy, and like all the Scott Kelby books I’ve personally read to date, this one is a great read.
I enjoy reading his books and always find useful tips and quicker ways to do certain things. I like the way he lays out his Digital Photography books, with one tip or technique on each page with a photo that gives a visual description. Scott has an easy to read writing style that I enjoy and I’d definitely recommend this one too. Obviously I’m not alone there, he’s the number one author in the world on these types of books for 4 years running. If you’d like to purchase a copy of any of these books, click on the Amazon link on this site to direct you there.
I personally would recommend reading the first two volumes to help get you up to speed. These books will only run you about $15 bucks each and are nice because even if you have really never picked up a camera, or if you have been shooting for years, you’ll find these books filled with useful information. I still go back to the first two volumes when I need to refresh my memory or to learn how to achieve a certain type of shot. They are all nice books to add to your photography collection, and if you liked the first two, you’re going to enjoy this one too! You can even purchase the whole set with Volumes 1, 2 and 3 in a boxed set. Nice huh?
 NAPP is “ The National Association of Photoshop Professionals ”
If you’ve been shooting digital for a while, then you have probably experimented with some sort of photo software by now. Every Digital Camera comes with some software to help you process the images after you capture them. Some of the better cameras have their own version of software that does more than enough for the average shooter.
I actually got into Digital Photography about 9 years ago. Back then Digital Cameras were pretty new to the general public and I found I liked playing around with my images after I shot them. I used to go online and check out anything and everything to do with Digital Photography and soon found out that when it came to editing your photos, the major player was a program called Photoshop. Unfortunately Photoshop was expensive and I didn’t want to pay full price so I shopped around online and found an unregistered copy on Ebay in my price range and I was off.
One day I was in a local bookstore and picked up a copy of a magazine called Photoshop User and started browsing through it. I had never even heard of it before and I instantly fell in love with it. The magazine was filled with tips and tricks, articles on learning Photoshop and tons of deals on photo gear and gadgets. But, the only way to get a subscription was to join NAPP for $99 per year. At the time, you got 8 issues of Photoshop User magazine which cost $10 apiece if you purchase them at a bookstore, so that meant your net cost of joining was really only $19. What do you actually get for $19 dollars these days? Here are just a few of the things you’ll find on their website. (Note: Starting in 2011 they now publish 10 issues a year at the same price)
Tutorials
The NAPP member website has a section for text and video tutorials written or taught by some of the top names in the Photoshop education including Scott Kelby, Dave Cross, Matt Kloskowski, RC Conception, Corey Barker and a ton of others. As of the moment I am writing this blog post, there are almost 1200 tutorials.
H.E.L.P. - Quick Video Tips
HELP stands for How-To Educational Library for Photoshop. This is basically a help center to answer any questions you have regarding Photoshop by showing you a short video clip on the topic that you need help with. Just select the topic you need help with and a box will come up with associated topics to choose from with a short video tutorial. Nice huh?
Tips & Tricks
This section of the NAPP member website currently contains a total of about 90 tips and tricks for using various features within Photoshop.
Shortcuts, Brushes, and Styles
There is one page on Photoshop keyboard shortcuts, another with Patterns and Brushes and a third page with Actions and Styles. I use these resources all the time and they are always free to download and use.
Help Center
This is one of my favorite things about NAPP. Have you ever tried to do something in Photoshop or Lightroom that you just couldn’t get right? Ever had a question about camera gear or computer equipment that was driving you nuts? Just go to the NAPP Help Center and see if your question has already been answered before. If it hasn’t, then submit your question and they’ll email you with the answer!
Member Discounts
Let me just rattle off a few places that offer discounts to NAPP members… Dell, Drobo, Adorama, Mpix, Kelby Training, Hoodman, Corel Painter, onOne Software, MacMall, LensProToGo, Office Depot, B&H, and a horde of Photoshop software plug-in makers. I have used the one for B&H enough times to pay for my membership practically. At B&H they not only give you a discount but they include free shipping too! Nice huh?
NAPP Perks
There are additional perks that only members get. These perks include access to product reviews, the NAPP newswire, lots of freebies only available to members from various companies that make Photoshop plug-ins and other software. Plus you get access to the NAPP member forums. The forums are a massive resource that you can not only tap into but also contribute to on all topics relating to your Photoshop and photography passion. This is also a great medium to network with other members.
The NAPP Store
The NAPP store offers books, DVD’s, online training, and seminars at a reduced cost to members. In some cases we are talking about greater than a 50% discount! Once you become a NAPP member you will never buy another book at full cost again!
NAPP Portfolios
The NAPP member website has a section for uploading images that you have created into a nice online portfolio that can be viewed by other members. It’s a nice way to check out other member’s photography.
Photoshop User TV
This is definitely one of my favorite perks from membership to NAPP. Not only do you get to view Photoshop User TV weekly, but you can also download previous episodes and watch them on your Ipod or your PC anytime. I’ve been watching the show since episode #1 (Oct.24th 2005) and always look forward to the next weeks show. There are now over 250 episodes to view any time you'd like!
To sign up for a NAPP membership you are going to pay $99. Now factor in the discounts that you get for the seminars, online training, Photoshop World tickets, books, DVD’s, not to mention 10 issues of the magazine and access to all the Photoshop User TV episodes, plus all the other perks that I mentioned above and it is almost like NAPP is paying YOU to join!
So what’s stopping you? Click on one of the links on my site and join today!
Now that digital cameras have been around for a while, most people either already own one or have at least used one. For the most part, they work exactly the same as the cameras you were used to shooting with before, but in a different format. They capture your images on digital media (a memory card) instead of film.
With so many different cameras to choose from and only so many different features, what are the manufacturers going to do in order to sell you new models? What they do is try to push megapixels on you as a way to purchase their particular brand of camera. The average consumer has been trained to think that they need super-megapixel cameras to take great shots and that is just not entirely true.
Here is what megapixels really mean: how large can you print your final photographs. The truth is that most consumers go to a local kiosk in a nearby mall or camera shop and only print regular 4 x 6 photo’s or maybe an occasional 8 x 10 in. print, and with a 5 megapixel camera you can actually print up to 11 x 14 inches.
Actually the 10 – 12 megapixel cameras are great, but just a few years ago they were usually just for pros or semi-pros who needed to print larger prints like a 16 x 20 in. or maybe a 24 x 36 inch.
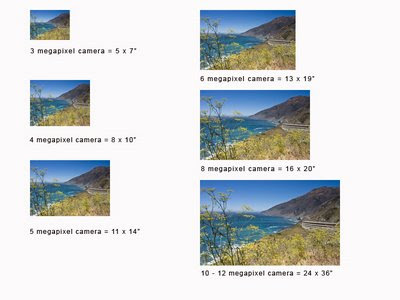
If you’d like to do some after the shot editing in your favorite photo software program, the extra megapixels allow you to zoom in really close to edit small sections of your photos with more detail and also allow you to crop to another size and still keep a printable image.
Just remember, unless you are specifically using your images only on the web, try to always shoot at the maximum resolution. Why have a 10 megapixel camera if you’re only going to shoot at 3 megapixels? You are actually throwing away valuable digital information. You can always make a smaller print, but it doesn’t work the other way around without manipulating pixels or special software!
I hope this information has helped you. Remember, keep shooting and have some fun!
If you are just getting started in digital photography or just want to start taking better photos, then there are some books that I would highly recommend to help you to start taking great photos.
As you probably know already, there are tons of books on the market and picking one to cover all the basics in a plain, easy to read format can get confusing. If a friend asked me to suggest a few good books to read, I would recommend the following three. My first two choices would be a pair of books written by Scott Kelby and the third book would be one written by Bryan Peterson.
 The Digital Photography Book and The Digital Photography Book Volume 2 by Scott Kelby are both enjoyable reading and full of useful tips and techniques. These books do a great job of getting you started in digital photography. In the first book (Volume #1) he covers a lot of the basics in good detail without getting too technical and even adds some tips on sharpening and printing your images. He has entire chapters written about shooting sports, people, weddings, landscapes and wraps up the book with a chapter called “Photo Recipes” with tips on what to do to get the shot.
In Volume 2 he actually picks up where he left off in the first book, and gives you tips on using flash, building a studio and shooting more professional portraits. Plus he has entire chapters devoted to shooting travel, landscape, macro photography just to name a few. He gives us tons of useful tips on how to take better photos. He even includes another chapter in this book on “Photo Recipes”. Both books are full of tips and techniques and loaded with photos and examples, which I will guarantee to help you take better photos. There is actually a Volume 3 in the works, which should be out very soon and I will definitely pick that up when it reaches the stores. Scott Kelby is the author of many excellent books on photography and Photoshop, all in an easy to read, friendly style all his own. If you ever have a chance to attended one of his all day Photoshop seminars I would recommend that also. Scott is also the president of the NAPP (National Association of Photoshop Professionals), which I have personally been a member of for a number of years. Joining NAPP entitles you to a yearly subscription to Photoshop User magazine, open access to Photoshop TV and tons of members perks and discounts. You can click on the banner at the bottom of this page to join or to just find out more about it. The third book is one I would highly recommend and is probably the most important book I’ve ever read on photography, it is called Understanding Exposure by Bryan Peterson. This book is a little more technical, and the author gets into details on aperture, shutter speeds and shooting in manual mode on your SLR camera. He also includes a lot of tips to help you get more creative in your photography. This book I consider a must read for anyone who wants to get the most out of his camera. I refer back to this book over and over and recommend it highly. I purchased this book and a training DVD and utilize them both often. Bryan, in addition to being a great photographer, is also the founder of The Perfect Picture School of Photography. It’s an online school that offers a wide choice of classes taught by excellent instructors. Click on the Amazon.com box on the side of this page and you will find all of these books and more.
I hope you have a chance to pick up these books. I will guarantee they will help you start to take photos you can be proud of. Remember, keep shooting and last but not least, have some fun!
The third book is one I would highly recommend and is probably the most important book I’ve ever read on photography, it is called Understanding Exposure by Bryan Peterson. This book is a little more technical, and the author gets into details on aperture, shutter speeds and shooting in manual mode on your SLR camera. He also includes a lot of tips to help you get more creative in your photography. This book I consider a must read for anyone who wants to get the most out of his camera. I refer back to this book over and over and recommend it highly. I purchased this book and a training DVD and utilize them both often. Bryan, in addition to being a great photographer, is also the founder of The Perfect Picture School of Photography. It’s an online school that offers a wide choice of classes taught by excellent instructors. Click on the Amazon.com box on the side of this page and you will find all of these books and more.
I hope you have a chance to pick up these books. I will guarantee they will help you start to take photos you can be proud of. Remember, keep shooting and last but not least, have some fun!
For some people who frequent my blog, you’ll notice I refer to a few different sites often, and I have a list of my favorite personal blogs that I check out regularly (on the left hand side of this page) and I also reference some of the equipment that I use personally. Every photographer will find the equipment that suits him or her best. Some times I’ll find a piece of equipment that “I can’t live without” while out shooting with friends in the field.
I personally have my own little set-up that covers just about everything I might need while out shooting. I’ve hinted around that I shoot with Canon gear, but that doesn’t mean I have anything against the other brands, its just what I use personally. Every manufacturer has its strong points. I got into Canon totally by accident after joining a camera class, but that’s a story for another blog post.
In my camera bag I have the “stuff” I use regularly. Here is a list of the gear I carry in my bag most of the time. My main camera bodies and four main lenses:
- Canon 5D Mk II
- Canon 17 - 40mm f / 4
- Canon 24 - 105mm f / 4
- Canon 70 - 200mm f / 2.8
- Canon 40D
- Tamron 17-50mm f/2.8
For each of these lenses I always have a clear UV filter on the end, for safety reasons mostly. I’ve seen expensive lenses get scratched or broken too often, and having one of these on your lens could possibly save you in the case of an accident.
I also have Polarizing filters for each of these lenses as well. These are definitely my most used filters. They are great for reducing reflections (like on water or glass) and for greatly enhancing your colors especially in skies, making your blues deeper and richer.
Another great piece of gear is my Graduated Neutral Density filter set-up. There are a number of different manufacturers that make them, I find that Cokin has the best set-up for me. They are great when shooting landscapes with the sky in the frame. The filter goes from dark at the top to clear at the bottom so you can compensate for the difference in the light. If you’ve ever taken a photo of a beautiful landscape and have either gotten blown out skies or the background had no details, you know what I mean. They can range from one to three stops usually. Here is more info on that: Graduated Neutral Density filters
Sometimes I like to shoot some “poor mans Macro” so I carry a set of extension tubes for that. They help to get really close up details of plants, insects, coins or any tiny objects by allowing you to focus closer. They fit between the camera body and the lens and are made by several manufacturers.
I also carry at least one external flash with a off-camera shoe cord with me. Being a Canon shooter, my main flash is a 580EX II speedlight. These are really useful to help you to take better photos by getting your flash off the camera. On my favorite websites on my blog list is the Strobist, and I check that out regularly. It was created by a man named David Hobby and it is all about shooting with off-camera flash, check it out.
Another few things you should always carry are a small air-blower and a bottle of lens cleaner solution and a micro-fiber lens cloth for cleaning the ends of your lenses and filters without scratching them. I watch people all to often use their shirt or a napkin to clean these and they can actually ruin your expensive gear!
Last but not least is my trusty Hoodman Loupe. These are great for checking out my LCD on the back of my camera. They come in handy when you really need to make sure you got the shot. Often when shooting outside on a sunny day you really can’t see your LCD without one. They are a little rectangular piece of gear that you put up to your eye and then put over your LCD to get complete glare free viewing. They even have a cord to hang around your neck which is very handy. Check them out here: Hoodman Loupe .
Well, that is just a little tour inside my camera bag, hopefully you got some good ideas out of it. Remember it really helps to think smart and travel light. You don’t want to be lugging around a ton of gear with you all the time. A little planning can go a long way.
These are just a few little tips and I hope you find them helpful.
Oh yeah, and last but not least, have some fun!
Having been around and involved in photography for many years, sometimes we get complacent and kind of dry up on new ideas. Sometimes we can get so busy, that when we do get some free time at the last minute and want to grab the camera and shoot something, we just don’t know what? Does this happen to you? With a little planning and forethought you can avoid this.
Fortunately I belong to a photo-club and we exchange ideas for new shoots. It’s usually a lot of fun getting together with other photographers for a day of shooting, especially when we have some location all planned out. If you don’t belong to a photo-club I would definitely recommend it. Not only will it help you to improve your shooting techniques, but it can be a lot fun to hang out with other photographers. Plus you never know when you’ll pick up a few good shooting tips or get some new creative ideas. Being out with other photographers you can compare shots either by ‘chimping’ on the spot (looking at your LCD screen) or by emailing shots afterwards. Comparing photos can always open you up to new ideas and helps to get the creative juices flowing. Perhaps you happen to live in a scenic area anyway, that can always be helpful. Even when shooting solo, with a little planning you can usually come up with some pretty good locations to shoot.
Over a period of time, every photographer will usually find his niche, something he loves to take photographs of. I’m a big fan of lighthouses and I enjoy just about anything to do with water. Fortunately I live on the New England coastline and there are tons of photo opportunities available.
If you’ve been shooting awhile, you already know that the best light is around daybreak or in the late afternoon and early evening hours. These times of the day the light is awesome and your photos will almost automatically improve just by shooting at those times. This is where planning really comes in handy because most of these little road-trips will take a little forethought. With a little effort you can make your day much more enjoyable.
Most of the time when you’re shooting something or someplace new, you’ll need directions. This is where maps (or your trusty GPS if you have one) can come in handy. Sometimes you might get the opportunity to scout out the location beforehand or go with someone who’s been there before, so that you’re better prepared. For photo shoots it’s a good idea to carry a comfortable backpack with a sturdy tripod strapped that to that. Most of the time it’s nice to have a small cooler or thermos with you also. Depending on how long you’ll be there, it might be a good idea to carry a snack or a lite lunch. It’s always nice to have a flashlight handy also. Learn to carry one in your bag all the time and you won’t regret it. They come in handy for checking trails or paths, or for just viewing your camera settings when it’s dark. Just make sure the batteries are charged. It’s a good idea to charge everything the night before your shoot, and get in the habit of using a checklist just to make sure you remember everything.
These are just a few little tips and I hope you find them helpful. Oh yeah, and last but not least, have some fun!
A lot of us were shooting 35mm or 110 films before digital photography took hold, so we had to develop a whole new set of techniques when digital started taking over. I remember I kept reading new articles about digital, and how it had its pro's and con's. Most people thought it was just a passing fad because the prices of digital cameras were astronomical and the quality was not that good. But low and behold, that's all changed and now its here and almost everything is shot digitally.
In the early days of digital you were limited to putting your photos on a CD and then handing it to the clerk for developing which was only available at certain places. Now, you can have your digital photos printed just about anywhere, and even do it without leaving your home.
Basically there are three ways of getting images printed:
- First, through photo centers or mini-labs (kiosks) at local stores;
- Second, through online printing services; and
- Third, by printing them up yourself at home.
The first option is the most popular. It's somewhat similar to the film days where you visit the store to drop off your "film" then come back to pick up your developed photos. Some have do-it-yourself digital kiosks that let you develop your digital photos through ATM-like machines. You can add borders or crop or a variety of other options.
The second way is online, just type in photo printing and you'll find dozens of sites to print them for you. Depending what you want to do with the photos, some companies let you upload your JPEG images and you set certain specifics like size and quantity while others require you download a version of ROES, which is like a online kiosk that lets you order your prints in a variety of templates and printing options. You can choose various papers, postcards, mugs, and calendars or matted prints and the list goes on.
The third way is getting more popular all the time, home printing. All digital cameras come with some photo editing software to 'tweak' your images, and they all have a learning curve. Secondly you'll need a decent printer. Printer prices have come down drastically and the print quality has gotten better and better.
Most of the free software programs that come with cameras are pretty good, and then there are some aftermarket programs that can range from inexpensive to quite costly. All of them require practice and some can feel overwhelming. Luckily there are literally hundreds of tutorials and tons of information online to help you learn the techniques. Do a little homework and take your time. It can be lots of fun and the printing possibilities are endless.
If you just bought a Canon camera, you will be happy to know that there are tons of Canon digital camera accessories that you can purchase to go along with your camera. When it comes to additions, Canon has certainly thought of everything. In fact, that's one of the best reasons to purchase a Canon camera - this is one camera that isn't a bore!
While some other cameras only come with a lens and a body, this isn't part of Canon's philosophy. Instead, you will find that the many add-ons listed below are more than enough to keep you occupied. When it comes to Canon digital camera accessories, you can choose from the following items: battery charger (very useful), soft case (practical for traveling), various accessory kits, any lens that you can think of, power adaptors, battery packs, various cables that attach to nearly anything, a new flash, and even a clever underwater housing wrapper.
Whether you plan to shoot on land or at sea, this is one camera that can really go with you anywhere. If you love to accessorize, you might want to consider one of the kits that Canon sells. These kits can contain anything from lenses to battery packs. You can find lots of Canon digital camera accessories and Canon kits online or in nearly any electronics store that you may come across. In fact, Canon often participates in various promotions that include cleverly put-together kits, which may interest you. Check on the Canon website in order to view current promotions - you'll find that nearly every season brings a different kind of Canon kit for you to choose from.
Purchasing a Canon camera is a great idea for those that enjoy different gadgets and accessories. No matter what kind of accessory you are searching for, Canon is sure to make it. Do you have a Canon camera? If so, make sure to purchase lots of Canon digital camera accessories. Part of the fun of owning a great camera is playing around with lenses, battery packs, and various cables that you can purchase. I like to shop online to find the best possible prices out there, and don't forget to check out those Canon kits sometimes you'll find fantastic deals!
As you begin to research the possibilities, you'll also find out a lot about different lenses and other items that you can add to your camera. In this manner, you'll quickly become incredibly knowledgeable about the many ins and outs of digital cameras.
Find out more by reading the full article which explains what you need to know about camera accessories. Thinking about getting camera accessories? Be sure to visit the author's website for more FREE Information as well as discounted camera accessories. Visit: Camera Accessories.
Copyright info: This article can be reproduced and duplicated only in its exact state with our website link attached.
Article Source: http://EzineArticles.com/?expert=Chris_Smitts
Adobe Photoshop and other image editing software are a necessary part of any photographer’s arsenal. Some photographers even supplement their income with a photo retouch business for competitors. Why would they do something like that? Because there is money to be made!
Retouching photos is a very time intensive task for most people. So, a person with talent in that area of expertise can charge a considerable amount of money for doing something they enjoy. Most photographers are just that... photographers. They want to be in the field as much as possible shooting images and not be stuck behind a desk editing their pictures. A savvy person can capitalize on this by advertising on a few basic sites and providing samples of their work.The needed resources to start a photo retouch business are:
· A computer with photo editing software
· Software proficiency
· Internet access and email able to receive large files (or use something similar to yousendit.com)
· A good work ethic.
Most of the time, a set fee is paid for certain services. This fee can be negotiated or be simply a flat per-image type of fee. Some common services would include:
· Levels adjustment
· Skin smoothing
· Sharpening and contrast boost
· Scaling for print
Take consideration when quoting time. Figure out how long it takes to adjust certain types of images and make a note of your most common edits, this way you will be able to advertise your specialties.
Once you've prepared yourself for the workload, simply post classified ads on free sites such as craigslist.org and photo forums and message boards. All of your work should be able to be done remotely from anywhere in the world via email. Enjoy!
Remember, as always, keep shooting and have some fun!
We all want to take better pictures. Modern digital cameras are incredibly complex devices and are more than capable of producing excellent images. All too often we are quick to blame our cameras for our poor photographs and instantly feel that when others show us their wonderful pictures that 'they must have a better camera than me'. This article will provide some basic tips that will help you improve your photography today. If you follow the advice offered here you are sure to improve the quality of pictures you take.
Focus on Composition
When you are out with the family and want to take a picture it can be all too easy to pull out the camera and take the snap before the moment disappears. Instead try to plan your shots a bit better. Rather than just looking at your kids smiling faces take a few moments to look ar the background. Is there a garbage bin next to them? Can you find a better back drop near by? If not then consider zooming in just for a head shot. The point is to pay attention not just to the subjects in your pictures but also to their surroundings.
Pay attention to light
Any professional photographer will tell you that light is their best friend. Pay attention to it and try to take most of your pictures when it is favorable. Sunset and sunrise generally provide the best times to photograph outside and the sun produces a warm bright light. In addition if you can avoid using the flash as it tends to make people look washed out and pale.
Shoot More
Do something enough times and you will get better. Get into the habit of taking more pictures. Try to always take your camera with you when you leave the house and shoot all day. The more you do this the better your eye will get at spotting potential for good photographs.
Now follow this link to learn more free basic photography tips.
Article Source: http://EzineArticles.com/?expert=James_McKerr
Selling photos online, doesn’t mean you need your own business, or even your own website. Some online services even provide a website for you to sell your work on. Normally you would have to hire a web designer, get a merchant account, setup up a credit card account etc. With today’s technology that is a thing of the past. Instead of using the photo networks, you can also build your own website online, free of charge in a matter of minutes with a Site Builder. Several companies have been experimenting to put together, “Do It Yourself” systems that make building a website a breeze. Google has caught on to this and came up with their own version like this blog here, called Google Blogger. You can find lots of these online, just type in “free websites” and check them out.
Once you have shot enough images and feel pretty comfortable with your digital camera, start looking online to find out what other Photographers are taking pictures of. See what is selling on some of the top sites, like I-Stock Photo or Getty Images.
Really dig deep into these sites and see what others have to say. See if any of the photos are rated and see which ones come up on the home page. Some of these sites have quality guidelines when selling though, so you have to read their Terms and Conditions pretty thoroughly. Some of these larger photo networks may be too competitive for you if you are just starting out. Another good idea is to really focus on selling photos in your local area. You can shoot photos of kids at the local baseball games, soccer games, football games, etc. and sell the photos to the parents. You could talk to restaurant managers at any of your local restaurants and see if they need any photos for upcoming ads or menu additions. Is your community growing? Are there new businesses popping up? Go to your local Chamber of Commerce and ask them if they can provide you a list of all the companies in your area or new businesses coming soon. Sometimes it is a paid list, but is usually worth it. Depending on where you live this business list can be anywhere from $15-$50, but again, it will give you an entire list of Names, Numbers and Addresses. There are plenty of photo opportunities out there, just do a little homework and start shooting.
Landscapes can be among the most captivating photos a photographer can create. They can also be challenging, especially when using a new digital camera. With a little preparation you will be able to create beautiful digital landscape photos.
The first tip is to be prepared. Carry a tripod as well as extra memory and batteries to allow you to keep shooting. Tripods will eliminate camera shake in your photos, which is particularly noticeable when you are shooting large vistas. You will also want to find a good telephoto and wide-angle lens for landscapes. Telephoto can be used to zoom in on interesting characteristics of the environment, while you would use the wide-angle to give a panoramic feel to your pictures.
The key to good shots outdoors is the light. The best time to shoot landscapes is early in the morning as the sun is coming up, or during dusk. This way the colors don't become washed out in the harsh mid-day sunlight and shadows tend to have more character.
Don't lose yourself in the background. Find an interesting element to focus on. This will give your pictures more character as ensure that the scale of your landscape is not lost on viewers. The foreground subject could be as simple as a person, or a unique rock outcropping.
Keep your photos off-centered. Referred to as the Rule of Thirds, you want to invasion the scene as being cut into three sections. Aim slightly off center, either along the horizontal or vertical axes, to give your pictures depth and a look of professionalism.
Find ways to guide your audience to the main feature you want to highlight. You can use anything that resembles a line running in the direction you want people to look in. It could be a river, a road, or kids running through a field, whatever. This again adds depth and scale to your photo, as well as giving it "life."
Play with black and white. Never before has it been possible for a photographer to seamlessly switch from colour to black and white photography. What used to necessitate several cameras is now as simple as the push of a button. Black and white produces drastic contrasts between light and dark and can make even a dull seeming picture more spellbinding.
Get more help on taking digital photography landscapes and other ways to get the best from your digital camera
Like so many other technologies, digital cameras have come a long way in a very short time. If you’ve decided to buy a digital SLR camera, have you worked out what features you are going to be looking for? Ask yourself what sort of photography do you intend to use the camera for. Just family type shots and everyday stuff or for photo’s you might be able to sell or make some nice wall prints?
Competition is fierce and prices have plummeted dramatically in recent years. If you are using your home PC to carry out photo editing, you will need to think about whether it is up to the task. Remember, you can never have too much RAM. Editing software is already included when you buy a digital camera but like everything, some programs are better than others. I use a full version of Photoshop and it can do just about everything, but can be rather intimidating at first.
The megapixel resolution of the camera should be set as high as it will go to insure the best quality and to produce decent size prints. You can always resize for the web or email later. Another thing to consider is the memory card. Most SLR cameras either don’t come with one or they are very small. Myself, I shoot mostly with a 10 megapixel camera and shoot totally RAW format (which are larger files) I use 4 GB cards, and can get around 300 photos on each card. These days’ cards are pretty inexpensive and I always carry a few with me (formatted). I advise against the larger 16 – 32 GB cards in case you lose one or have an accident, and for quicker download times.
From the moment you pick it up, it should feel right in your hands. Consider where the buttons are located and how they are spaced out. Digital cameras use a great deal of power, mostly the LCD screen. Most of the better cameras come with a rechargeable battery pack and I always carry a spare (charged) with me. If they are not supplied, I recommend rechargeable batteries. I use those with my external flash units and they pay for themselves easily. (just remember to charge them before using them) When buying your digital camera, look for a nice large LCD, these days 2½ in or 3 in. screens are common.
Depending of what type of shooting you’ll be doing, lenses are major factor in camera packages. You can easily spend more on lenses than you do on the camera body itself, but there are some nice camera outfits aimed at the beginner at very decent prices. Do yourself a favor when buying new, shop with a reputable dealer and do some Internet research on features. Try to purchase the best you can afford and it will pay off in the long run. If you’ve narrowed down a camera, you can find some great used outfits on places like Craigslist.com. Plus try to talk with people who shoot regularly or are members of a local camera club for some inside tips. Oh yeah, and last but not least, keep shooting and have some fun!
If you are shooting wide open, which is at the camera's largest aperture, your depth of field will be correspondingly shallow. That means your focus is going to be even more critical than otherwise. Pick a point that needs to be sharp and really pay attention to keeping that point sharp. Generally, if you are shooting people, the most important thing to keep sharp is the eyes. When I am shooting people I focus on the eyes, shoot, re-focus and shoot again...and then do it all over again. I can't tell you how much I hate to be editing and find that I have a potentially great shot, but out of focus eyes ruin the picture. I have found that if I am worried about an image not being sharp, I am usually right. Pixels are cheap...shoot enough to make sure you have your shot!
Shooting for stock, know your equipment, know your agency
If you are shooting with a stock agency in mind it is good to know just how high you can push your ISO before you reach the point where the agency is going to reject the image. That means you have to know both your own equipment and the standards of the agency. I was once shooting from the interior of a jeep on a mountain road in China. The scene, road-building equipment clearing a landslide, was lit by the headlights of the cars waiting for the road to be cleared. I shot the scene, hand held, but braced against the head-rest, at an ISO of 1600 with a Canon 1ds. Man did I work on that image in post (processing the digital files)! They accepted it too. With the newer cameras I have no qualms about shooting at 400, I am comfortable shooting at 800 and don't think 1600 would really be such a stretch. But don't take my word for it... do some testing!
Exposure and more
RAW (the file format native to the camera) has been talked to death, but keep in mind that it is more akin to negative film than transparency film and I personally find that I can safely get another stop to a stop-and-a-half in post-shoot processing. Shoot RAW, not jpeg! As far as exposure, keep your histogram as far to the right as possible without clipping (going off the edge). If you loose your highlights (which are on the right hand side of the histogram) you probably can't get them back. I guess in that way a digital file is like transparency film.
I am not a big user of on-camera flash, but it can be a real life-saver. I suggest a good starting point is to set your flash to under expose by two-thirds of a stop. That can help bring out details without overpowering the image...and looking like you used on-camera flash! If you do use on-camera flash it is generally a good idea to bounce it or at least put some sort of diffuser over it.
Use movement to your advantage
Another thing to keep in mind is that a little movement in your image isn't necessarily an image killer. Sometimes you can make it work to your advantage. A year ago I was shooting in the train station in Mumbai, India. The station is indoors and while it wasn't exactly gloomy, it still qualifies as low light. I put the camera over my head as high as I could hold it and fired off a half-dozen frames at an eighth of a second. I only shot six frames because at that point a machine gun carrying police officer politely but firmly informed me that photography in the train station was forbidden. That image, in which everything has movement, even the lamp posts, has already sold a number of times as a stock picture with Getty Images (1377). Sometimes movement can make an image more dynamic and help it convey a mood or message.
Stock Photos of cute puppies, cats, cows, elephants happy people, ethnic people etc.: John Lund Stock Photos Animal stock photos, Fine Art Prints, and printed gift merchandise
Visit John Lund's Blog Creative Stock Photography Concept stock photos, Fine Art Prints, and printed gift merchandiseArticle Source: http://EzineArticles.com/?expert=John_M_Lund
A picture is worth a thousand words and that is why beautifully edited photos make loud statements and speak for themselves. As a photographer, you need to know how to use Photoshop to process all your digital photos, touch them up for professional look and feel. Photoshop software is used all over the world to edit, amend and touch up dull looking photos into elegant vivid colored photos that are used for magazines and newspapers.
You don't have to be a Professional Photographer. These days you do not have to be a professional photographer to produce quality photos. You do not have to learn how to do exposure compensation, white light balance, aperture adjustments, field of depth knowledge or to tweak your SLR camera. Just a normal digital camera to take photos and software to download to the computer is sufficient for you to produce professional looking photographs by using this software. It can correct the color saturation, make good exposure compensation and remove blemishes to old yellowed photos and add in new backgrounds.
By using levels adjustment in Photoshop, you can instantly add more colors to your otherwise plain washed out photos. One can also brighten up the colors and images in a dull and dark lighting. If your flash light is not powerful enough to reach the distant environment, fret not because you can turn to Photoshop to brighten up the dark photos.
Correct Hand Shake Errors. You can also correct hand shake errors in your digital photos by sharpening the images with the various tools like Smart Sharpen. Alternatively, you can also blur your photos for that misty feel by using Smart Blur. One can also change the numbers of the car plate, remove an unwanted object in the photos or add new objects to them. Such is the power of Photoshop for photographers.
You can also add text to your photos for posterity. On the other hand, you can also add a copy right text with your name to the digital image including the copyright sign to show ownership. This is useful when you need to post photos of products in eBay pages so that your potential clients know that the photos originate from you and not copied elsewhere.
If you are an avid aspiring photographer, it makes good sense to sign up for a course in Photoshop so that you know the basics of how to edit your digital photographs, re-size them for faster upload to the web sites. This is an investment in itself.
We are all well aware that Digital photography has changed the way in which we look at our family photos. It was only a few short years ago we use to wait with excitement for our vacation photos to be developed and printed at the local photo lab, now it's all different because we can view the results on the LCD screen on the back of our digital camera right on the spot.
It's then easy to decide if we want to change the exposure, the position of the camera, or whatever else, simply by viewing the image on the screen immediately after taking the picture and deciding if a re-shoot is the best option or deleting the unwanted image just taken... In fact life couldn't be easier!
But don't you miss the good old family album, recording events as they happened... Well there's no need to fret because you can still do exactly the same thing and have your digital lab print up only what you need. Now here is the big advantage, apart from the saving in costs of buying, processing and printing all the images taken, many just don't make it to print. Any images you don't like you just simply delete them, saving only the better ones. This means when it comes to getting the digital lab to print up your images of choice, there is a substantial saving to you. These days a lot of people are investing in a good printer and printing them themselves and Digital Scrapbooking is really catching on.
Also consider the other options, for example keeping your family in the loop with up-dated images of your vacation and other special events via your email. This doesn't cost you a thing and sometimes your family and friends are grateful that you thought of them by supplying your latest vacation images for them to see.
So in a way, not only can you maintain your traditional family album the same way you always did, you can also store your latest images on your computer, perhaps later burning to disc to save hard drive space or maybe to send a disc to your family and friends. These days people are already taking this for granted, so occasionally you need some old photographer like me to remind you that it wasn't always that easy!
Next time you take a digital photo, think of what I've just reminded you of and really use these options to the fullest….and remember, keep shooting and have some fun !

 I haven’t posted anything for quite awhile so I guess it’s about time huh? I recently ordered a book that I was really excited about and I think you'll be very pleased with also. The name of the book is On Camera Flash – Techniques for Digital Wedding and Portrait Photography, written by a fellow blogger and pro photographer from the New Jersey area, Neil van Niekerk. I have a few select blogs and websites I frequent regularly and Neil’s (Tangents) is one of those.


