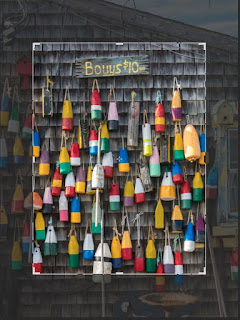
Here’s a simple lesson that you might find useful to see if your image might look good with a matted style border before you go thru all the work printing and cutting matt board etc.
1. Open the image you
want to add the border to in Photoshop. This tip works quicker if you have a
single layered image. If you have multiple layers, it’s just one more step, no
biggie. Click on the top layer and press and hold the Shift-Ctrl+Alt keys
and then tap the letter E. This will put a flattened copy of all your layers on
top of the layer stack that we can work on.
 2. Maybe you
like your image as it is and it doesn’t need to be cropped, then jump down to Step
3. If you’d like to crop your image a little, just hit the C key for the crop
tool and press and hold the Alt key and drag a corner handle inwards until it
looks good to you and then click the checkmark of the title bar to accept the
crop. By holding the Alt key, you keep it
in the same orientation as your original.
Now we’ll add a
stroke to our image to help separate our photo a little better.
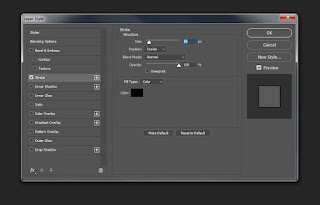
 3. Click on the Add a layer style button on the
bottom of the Layers Panel (fx). On
my image I chose a 5 pixel stroke in black because I was going to use a white
background around my image and I like the way it looks. You can set the color
and width of the stroke to your own liking.
Tip:
When your adding your stroke, make you sure you set the Position to Inside (underneath
size) because that will give you nice sharp corners around your image.
4. Now we’ve got
our stroke around our image we’ll add our border, but first we need a blank
layer beneath our image to make this work properly. Make sure your background
layer is unlocked, then press the Ctrl key and click the Create a new layer
button on the bottom of the Layers panel (next to the trash can icon) If your
image is locked you won’t be able to add a layer beneath it. By holding the
Ctrl button, it will put a new layer beneath your image layer. Now click the
image layer to make it active and choose the Crop tool again. You’ll see the
crop border around our image. Press and
hold the Alt key and drag a corner handle outwards until you have enough border.
When it looks good, click the checkmark on the title bar to accept the crop.
You’ll notice you now have a grey and white checkerboard around your image
indicating blank canvas. To fix this, make the blank layer active by clicking
on it and then fill it with your choice of color. You can do this easily by
pressing the Shift key and tapping the F5 key to bring up the Fill dialog box.
Select your choice from the dropdown menu and your all set. You can flatten
your document and print it this way or just use it as a guide, you decide.
There are also ways to add different widths to a single side or multiple sides,
but that’s a lesson for another post.
I use this quick
method just to see if I might like to make a print of an image before going
through the whole process cutting a matt and framing the print. I wrote a
pretty lengthy post on another method back in Feb. 2011, check it out here if
you’d like to see it. Gallery Style Templates I hope
you enjoyed this tutorial and find it useful.
Remember, as
always, keep shooting and have some fun!


