 Have you ever wanted to email someone a bunch of images, but they were shot in RAW and you didn’t want to convert them into JPEG’s one by one? Or maybe you just want to send proof’s before you do your final editing? This tutorial specifies RAW files but it can also be used on other types as well. Droplets were designed to save us time when doing tasks repetitively.
This post is for those of you who have never used or perhaps never even heard of Droplets before. Droplets are one of those nice little features inside Photoshop that most people don’t know about. They are little applications that sit outside of Photoshop and run actions for you automatically, almost like the Batch command. Now you can create Droplets to do all sorts of things, but in this post I’ll show you how to create one that will let you drag-and-drop an image (or a whole folder of images) onto a droplet that will change the color space, the file size and then save them as JPEG’s in a favorite folder – all automatically! You do need Photoshop to create a droplet, but you don’t have to know how to use Photoshop to run one. Stick with me; I’m sure you’ll like this tutorial.
Step One: Open a RAW file in the Camera RAW panel. For this step, make sure your image is in landscape orientation, if it isn’t, open one that is. Also, make sure it will open in 8 bit mode. If you don’t know how to tell what mode it will open in, look beneath the preview window and it will say either 8 bit or 16 bit. If you have to change it, click on the blue bar underneath the photo and you’ll get a dialog box that will let you change it there. Once you change it, all your RAW images will open in 8 bit mode until you change this back. (See photo) Now click the Open Image button to open it in Photoshop.

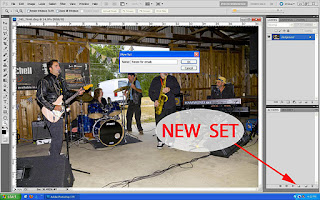
 Once it opens in Photoshop, open up the Actions panel (Window > Actions). All of my resizing Actions are kept in a separate set, so click on the Create New Set icon at the bottom of the Actions panel. In the dialog box, name it Resize for emails.
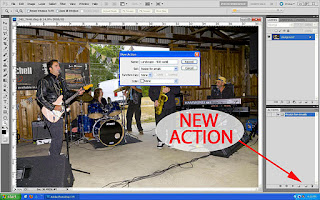
 If you don’t want to create a new set just click on Create New Action instead and then name it Landscape – 900 wide. Then hit the Record button.

Step Two: Now go up to the Image menu and choose Image Size. Change the width to 900 pixels. If the Height value doesn’t change automatically, make sure the checkbox for Constrain Proportions at the bottom is turned on. Don’t worry about resolution. Now click OK to resize the photo.
Now go over to the Edit menu, scroll down to Convert to profile and change the profile to sRGB IEC61966-2.1. Finally, go to File>Save As and when the dialog box opens up, change the format to JPEG and click Save. Don’t worry about where you save it; anywhere will be fine for now.
Now you should get another dialog box for JPEG options, I use 5 Medium to keep my file sizes small (usually around 100 - 150 kb’s) but you can use whatever you choose, The larger the size, the higher the quality.
Now just click the Stop button on the bottom of the Actions panel.
Now you should have 3 steps in your new Action: Image Size, Convert to Profile and Save. Now we’ll create our droplet.


Step Three: Go up to the File menu, scroll down to Automate and choose Create Droplet.
The Create Droplet dialog box will open up. (See photo) The first step is to click the Choose button at the top to tell Photoshop where to save your droplet. This is not telling Photoshop where you want to save your images, instead you’re telling it where to save the Droplet Icon. I put mine on the desktop. Name this droplet Landscape and click Save.
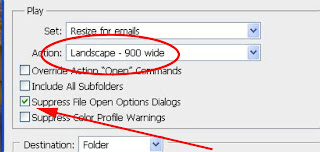
 Step Four: In the Play section, it asks you to choose an action to run. In this lesson, we’ll use the same action we created in Step One. Since we’re opening RAW files (RAW files automatically open in the Camera RAW dialog) turn on the Suppress File Open Options Dialogs checkbox so we won’t see the Camera RAW dialog every time. Important Tip: Make sure your action you’ve included in this droplet always exists or this droplet will not work anymore!
 Step Five: Under the Destination menu, select Folder, this is where your final images will be stored when your Droplet has finished running. I have a folder on my desktop called JPEG’s for Email and that works for me. You can pick any folder and now all your images will be placed there. Nice huh? Now back in Step Two when we recorded the Action, we saved the image remember? Well, we really don’t want every image to be saved with the same name we did in that step, so check the Overide Action “Save As” Commands to override the location/name we used there and use the original (it’s OK because it’ll be a different file format) In the File Naming section, you can choose to generate a custom name for each image, but I personally leave mine at the defaults. I can rename them later by using the Batch command if I need to.
Step Six: Now some of you might be using a Mac and a PC at the same time and want to use this Droplet on both machines, choose as many Compatibility settings as you want. Usually if you’re working on just one system, you’ll leave the default checkbox for your operating system selected.
Important Tip: If there’s an error, you don’t want to find out after you’ve ran this Droplet on a hundred images, so leave the default Stop for Errors setting turned on. That way if something messes up, it will stop and let you know about it!

Step Seven: When you’re done, click OK to create your Droplet. Nothing will happen yet because you haven’t ran any Actions yet, but if you check your desktop you will see a new Icon called Landscape. (See photo)
Step Eight: Now, anyone who knows how to drag-and-drop can use this Droplet. To use it, simply drag an image (or even a whole folder of images) onto the Droplet Icon on your desktop. If Photoshop isn’t open, it will launch itself and run the batch process you specified in Step Four. When it is done, it will put your images in the folder you chose. Remember to make sure all your images are in Landscape orientation. To create one for Portrait mode, go back to step one, open a RAW image that is in Portrait orientation instead and when you have to name your new action, call it Portrait – 600 wide. In step Four, choose the new action instead. You shouldn’t have any problems. To try it out, just get a few RAW files and drop them onto the droplets and then check your destination folder.......Nice huh?
Remember, you can create Droplets to do many repetitive things for you to make your work flow easier. I hope you’ve enjoyed this tutorial and find it useful. Feel free to pass it on and remember, as always, keep shooting and have some fun!


