
Some people who own digital cameras don’t even know that their cameras record a variety of things automatically when you take the photo. Just about every camera records the Camera Make and Model, Shooting Date/Time, Shutter Speed, Exposure Program, F-Stop, Aperture, ISO, Lens, Metering Mode and most of them can even tell you if you used your flash! This info is called the Metadata and it can be very useful. Those of us in the field using Photoshop or Lightroom usually have our own Metadata Templates that we automatically embed into our files when we take them off our cards on import. For me, I only use three boxes in the Metadata Panel – Camera Data, IPTC and Description. There are a bunch more, but 90% of the time I don’t need them myself.
Some of this info is mainly for our own personal use, but other things like our studio name or website and email address’s can come in handy. It also helps us with archiving because by adding keywords it will help us find them easier on our computers when we start getting thousands of photos. It also helps us in keeping track of things like shooting dates or occasions. But for me, some of this is info that I don’t want to share with everyone on the Internet, so I like to remove all that info before I start sending any of my photos off into the big scary world.Most of my work is finished off in Photoshop, so I’ve created all sorts of different Actions to help me do tons of different things that I do all the time without having to go through the whole process over and over. Here is a little tutorial that will take you through the process of creating an Action that will automatically remove all of your Metadata info with just one mouse click so you can send them off with a little more confidence.
 In this first image, you can see all the different camera settings. You’ll notice it was taken with a Canon EOS 5D on 10/9/2010 at 3:20:36pm and all sorts of other data. I don’t really like to share this info, but because
this info might help me to prove ownership if someone tries to use my images
without my permission, I’ll keep it in my main file.
In this first image, you can see all the different camera settings. You’ll notice it was taken with a Canon EOS 5D on 10/9/2010 at 3:20:36pm and all sorts of other data. I don’t really like to share this info, but because
this info might help me to prove ownership if someone tries to use my images
without my permission, I’ll keep it in my main file. Now check out this second window. Notice all the new Metadata info, called IPTC. For purposes of this tutorial I’ve used fictional data, but you get the idea. Granted, sometimes I’m only sending a photo off to a family member or friend, but I still feel better when I remove this info.
 The third tab, called Description, has places where I can add a description, rate the photo with one to five stars, add keywords and copyright status, notices, and info with links. You’ll notice on the bottom it also has other info, like the shooting date and time, format and a few other things I like. Lets get started:
Open any single photo in Photoshop, preferably a JPEG in sRGB mode so you can follow along. Now hold down the Shift + Ctrl + Alt and tap the letter I key to bring up the info on your image. You can also go under the File menu and click on File Info. This will also bring up the same dialog box. Click on all the tabs on the top of the box to see your info.
You’ll see how simple it can be to create an Action to strip out your Metadata with just one mouse click. In a future tutorial I’ll show you how to create Droplets so you can run these Actions on whole folders at the same time. Watch my blog for future tutorials.
Now, go up under the Window menu and click on Actions to bring up our Action Panel. On the bottom of that panel, click on the icon next to the trashcan to create a new Action.
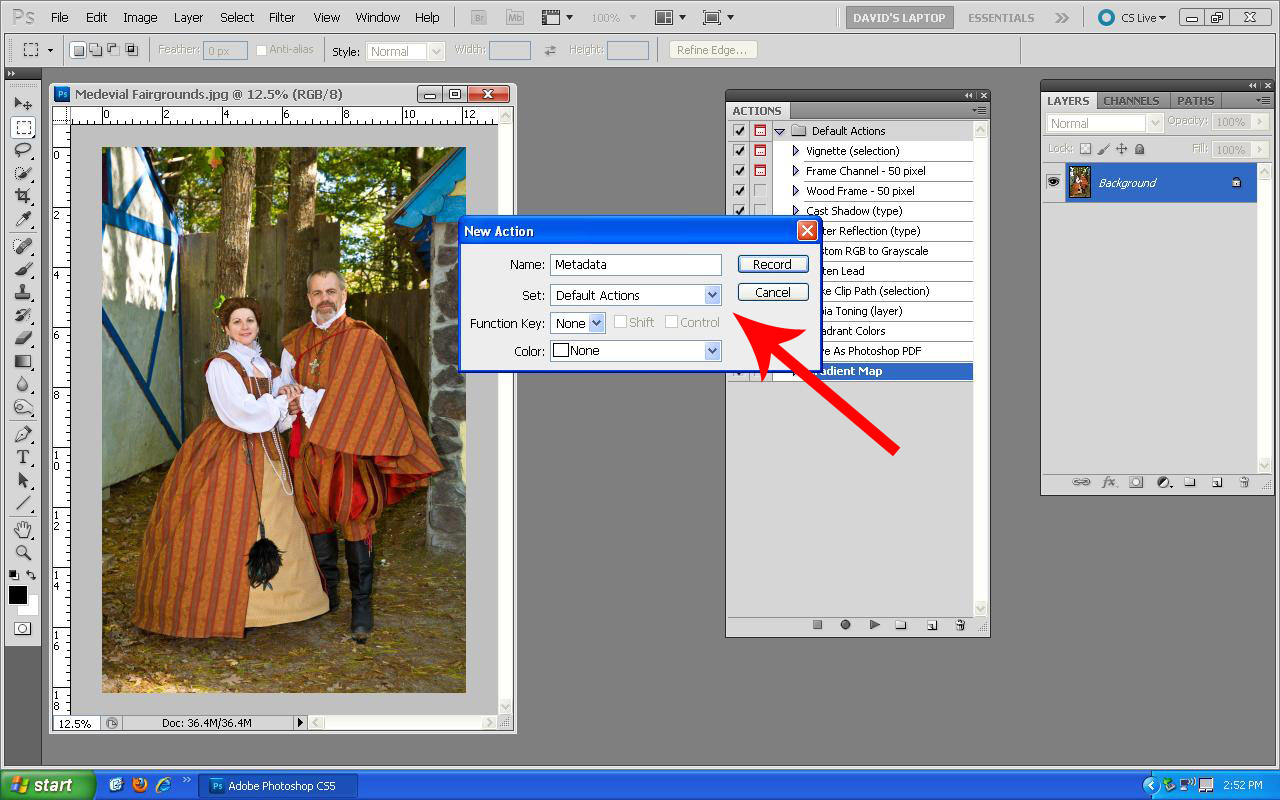
 A dialog box will come up, name it Metadata, and click the dropdown menu beneath it and click the Default Actions folder. You’ll notice you can also add a Function Key to your Action and a Color, but we’re going to skip that this time. Hit Record in the top right corner to start recording and you should see a Red Circle on the bottom of your Action Panel now.
 First we need to select the image. I’m a big fan of shortcut keys, so hold the Ctrl key down and tap the letter A key. You can also go under the Select menu and click on All. You’ll see the marching ants around your photo. Now hold the Ctrl key and tap the letter C key to copy your selection to the clipboard. You can also go under the Edit menu and click on Copy.
 Now we need to create a new template for our image, this is easy to do. Hold the Ctrl key and tap the letter N key to create a new document exactly the same size as our original or go up under the File menu and click on New. This will open a Dialog box and you can just click the OK button and it will create a new blank document the exact size to paste our image into.
Note: if you have more than one image open in Photoshop, you’ll have to tap the drop down menu in the Preset box and tap on the name of the image you just copied.
Now hold the Ctrl key down and tap the V key or go up under the Edit menu and click Paste. Also, a lot of us shoot in a different color space in our cameras, so when you try to you paste your image, you might get a Profile Mismatch Dialog box asking if you want to convert to a different color profile. For the purpose of this tutorial click on Don’t Convert and click OK.
 You should have two documents open on your desktop now. Click on the tab of the original image to make it active, you’ll see your marching ants. Now hold the Ctrl key and tap the D key to deselect the image and turn off the ants and then click the X to close it, we won’t need it anymore. This will leave you with our new image.
 Now on the bottom of the Actions Panel, click the square box on the bottom next to the Red circle to turn off our recording. If you want, go and check out your File Info again you’ll see we just stripped out all that information.
Now you should have a copy of your original without any of the Metadata in it. If you want to, you can resize your new file now and then go up under the File menu and click Save As or just hold Ctrl + Shift and tap the letter S key. This will bring up another dialog box, choose your file format and a place to save it to and give it a new name if you’d like. Now close that file, and open your original. You should still have the Actions Panel open so just click the start arrow and play your actions.....Nice huh?
There you have it, a quick and simple way to make a duplicate photo, with all your Metadata stripped out with just one mouse click. I’m a big fan of anything that will save me time. I have a whole set of Actions that I use to strip Metadata, resize for the web, change the color space and even drop the finished images into special folders on my desktop, all with a single click of the mouse (or pen ) I hope this tutorial will help you out.
Remember, as always, keep shooting and have some fun!


