April 24, 2012

Change your colors quickly in Photoshop

When I have a pretty simple selection and want to check out different color ideas, there is one technique I like to use to change colors quickly in Photoshop. Like just about everything in Photoshop, there are many ways to get the same result. Using this method, you can change the color of an object in your photos and still change your mind later, because all the work is done on its own layer. You could use Smart Layers and Smart Filters, but by doing it this way I don’t have to use those. I use a pen with a Wacom tablet which makes this tutorial even easier, but you can still follow along if you use a mouse too.


1. Start by opening a photo with an object that we can re-colorize. First we need to create a new layer but we want to able to change the blending mode of the layer itself, so press Shift-Control-N and you’ll get this dialog box. We’ll change the layers name to Color in the Name box, and then change the Mode in the drop-down menu to Hue. This will control how the color we choose for our new layer interacts with the color on another layer. Doing it this way keeps the lightness and saturation values of the base color (the color in your original photo) and adds the hue of our blend color (our new paint job). Click OK.


Now if you are changing the color of something that is pretty easy to select I’d suggest using the Magic Wand or the Quick Selection tool but if you need a really precise selection, I’d use the Pen tool. If the color you want to change is a solid color and it’s the only shade of that color in the photo, you could use the Selective Color tool. But for this tutorial we’ll make our selection another way, using the paint brush method.


2. Now press (B) to grab the Brush tool and choose a semi-soft edged brush from the Brush Presets on the left hand side of the Options Bar (around 80% hardness). Now we need to choose our new color so click the Foreground color swatch at the bottom or your toolbar and pick your color. You can drag your curser over your photo to choose a color from somewhere in your original photo or you can use the Color Picker box, either one works fine. When you’ve selected a color, click OK.


3. Here is where we work our trick. With your Color layer active, (you might need to zoom in close for extra detail) With the brush, start painting over the object you want to re-colorize. If the object your painting has a lot of black, whites or grays, you can usually paint right over those areas and they won’t change because we are working in Hue blend mode and it won’t affect those areas.


4. Don’t worry too much if you get a little sloppy on your paint job, you can always use the eraser tool later to clean that up. Just press (E) then go up to the Options Bar and change the Mode in the drop-down menu to Brush. Again, use a fairly hard edged brush and zoom in tight. Remember, you can change the size of your brush on the fly by tapping the left or right bracket keys next to the letter P on the keyboard. Adding the shift key when resizing will make the edges harder or softer.


5. So after you’ve selected a color and painted on your new layer, stop and check it out. Holding the Alt key, click on the eyeball next to your new Color layer and you’ll see only your new paint job layer. (hold the Alt key again and click the same place to show all layers again) Not too happy with that color? No problem, here is an added trick. Go down to the bottom of the Layers Pallette and click on the little black & white circle in the middle called ‘Create new fill or adjustment layer’, then select Hue/Saturation. Now we want to only change the color on our new layer so while holding down the Alt. key, hover over the line right between the new Hue/Saturation layer and our Color layer until you see a little circle shape, then click on the line. This is called clipping and will only allow changes on that layer instead of any other layers.


Now comes the fun part. Because we clipped those two layers we can do all sort of fun stuff. On the bottom of that panel you’ll see a check box called Colorize. Click it and play around with the sliders. Now unclick and see what colors you get. Remember, this layers blend mode is set to Hue so it is just affects the Hue of the color you chose. Still can’t get the color you want? Create a new layer using the methods above with another color, then place that new layer under your first layer. Play with the sliders and click the Colorize button on and off to experiment. Now play around with the opacity of the first color layer in the Layers Pallette. The possibilities are endless. Notice how the only thing changing is the color of your new layers and not your original layer?


When you get a color you’re happy with, make the top layer in the Layers panel active by clicking on it, then hold down the Shift-Control-Alt keys and tap the letter E. This will create a flattened version of your file on top so you still have all your layers. Now hold the Control key and click on that layers thumbnail (you’ll see marching ants around it) then hold the Control and tap C to copy your image. Don’t deselect yet, click on the File menu in Photoshop and click New. This will create a new file with the same dimensions as your scooter photo. Hold the Control key and tap the letter V to paste your photo into that file (notice only one layer) and then Save it as you like. Now go back to your original photo, hit Control D to deselect it. Now you can delete that flattened layer if you’d like. Now save your original as a PSD and you can come back later and change your colors again……Nice huh? 

Remember, as always, keep shooting and have some fun!

March 26, 2012

Ten Quick Tips To Take Better Photos

1.      Know Your Camera – I’ll say it again, know your camera. Does this sound familiar? These days’ people go out and buy the latest and greatest digital camera out there, come home, rip open the box, and then proceed to fiddle with the device. Sometimes they might briefly flick through the camera manual and then they never look at it again? Not a good idea! If you buy a digital camera, you owe it to yourself to understand its ins and outs. Take some time to read the manuals. I always carry my manuals in my camera bag. Learn how to control exposure, how to use different camera modes and how to use the flash if it has one. The knowledge you gain about the camera will be invaluable when you're out in the field taking those special photos. Even if you’re an old pro and are experienced with photography, every new camera has new and improved features that will probably surprise you.


      2.  Shoot in the highest or largest quality file your camera can produce. (preferably large RAW mode)  You can always reduce the file later, but you can't always make it bigger.  Why buy a 16 or 20 megapixel camera if you’re not going to take advantage of all those pixels? People say they don’t want to fill their cards up but face it, these days you can get a 16 GB card for as low as $10 on the Internet.  Shooting larger files also helps if you’d like to zoom in on a specific part in your photo and crop your shot while retaining a quality image.


    3.  Rule of thirds and composition – One of the most popular 'rules' in photography is the Rule of Thirds. It works like this: Imaginary lines are drawn dividing the image into thirds both horizontally and vertically, sort of like a tic-tac-toe game. You place important elements of your composition where these lines intersect. But like all things, rules are meant to be broken. Sometimes when you compose your shot, you either need to move your subject around or get in closer yourself. Try to frame it so that your intended content fills most of the picture area. Remember, as photographer Rick Sammon says:  ”the name of the game is to fill your frame”.


    4.  Tripods and Ballheads – I consider these “must have’s” for anyone who wants to try to take better landscape shots or for taking group photos.  They also come in handy when shooting in dim light to avoid camera shake or when you’re shooting macro style photography.  A couple useful tips when shooting on a tripod, try to use the lowest ISO and remember to turn off Vibration Reduction or Image Stabilization on your lenses (if they have this feature) or else they will try to find some movement and that can also cause some vibration in itself.


5.  Cable Release cords.  If you want really tack-sharp landscape photos, then you definitely want to use a cable release cord. Believe it or not, just pushing the shutter button will cause the camera to move slightly. Remember, if you’re out shooting and forgot yours, you can always use your cameras self-timer feature in a pinch. These days just about every Digital Camera has this feature. 


    6.  Get down to their level - This is a great tip if you’re shooting kids or pets (and even flowers)  Next time your shooting photos of your kids, get down on one knee (or on the ground) and shoot at their eye level. You’ll be amazed at how much better your shots look. 


    7.  Lock the focus – Sometimes your subject is not in the center of the picture, in these cases, you might need to lock the focus to create a sharp picture. Usually you can lock the focus in three steps. First, center the subject and press and hold the shutter button halfway down. Second, reposition your camera (while still holding the shutter button) so the subject is away from the center. And third, finish by pressing the shutter button all the way down to take the picture. Most cameras these days will let you change the focal point (or points) in the camera for times like this, but I always have my center focal point active so it’s easier for me to just recompose this way. In these images of the geese, the red box shows where the focus was locked by the camera. Using my method will avoid that mistake and ensure your focus is correct.

I personally have all my DSLR's set up for Back-Button focusing which is an even more accurate focusing mode, but that is a whole lesson in itself. To find out about this feature or to see if your camera will allow you to set it up this way, Google Back-Button focusing for your camera model, you just might like it yourself. 

   
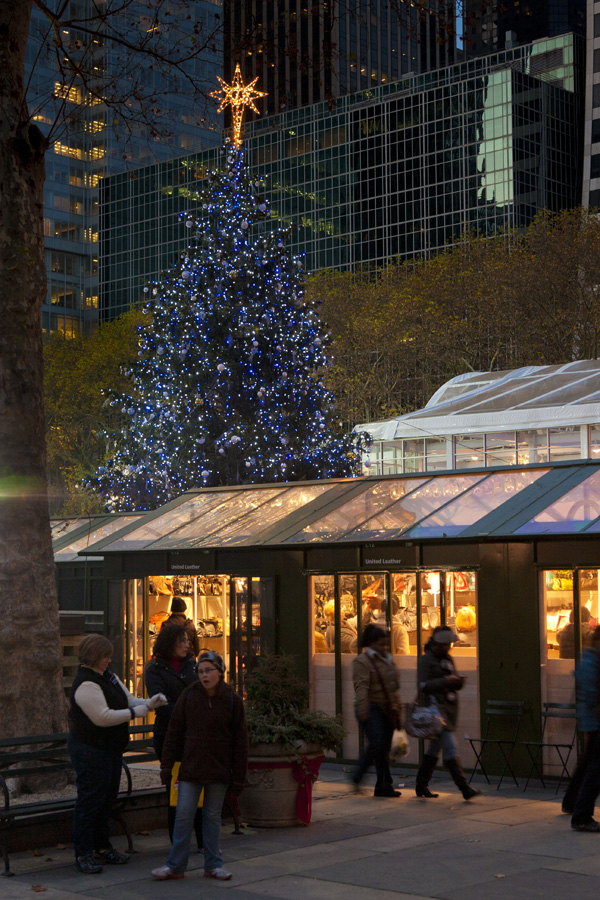
   8.   Try to use natural light and take lots of pictures - Digital cameras are great for this. You can experiment by taking as many test shots as you like using various camera settings, compositions, etc. You also get instant feedback by way of the LCD preview screen. If you don't like the shot, you can delete it right away. For this image of the Christmas tree (taken in Bryant Park in New York City) I wanted the natural light. I knew I’d have a little motion blur with the people walking by unless I pumped the ISO out of site so I kept it at 400 and that was ok with me. Remember the rule, “Practice Makes Perfect”.


9.  Using flash outdoors - In photography, everything is about the light.  Flash allows you to take control during those times when you don't have the luxury of great natural light. Become proficient at carrying and using flash outside and you’ll be able to take your photography to new heights. Using a little fill-flash when shooting back-lit subjects can save the day and help fill in all those dark spots, like under the eyes for example.  


  10. Take some vertical pictures – Are you one of those people who never shoot any vertical photos?  All sorts of things look better in a vertical format, anything from a lighthouse near a cliff, the Statue of Liberty or your grand-daughter jumping in a puddle. Next time you’re out shooting make a conscious effort to shoot some vertical pictures too! 

    These are just a few tips and ideas to help you take better photos. Look for another set of tips soon. Like all things, practice makes perfect.  Don’t be afraid to take a bunch of shots or to shoot something different, you might just find your own little niche.
    
Remember, as always, keep shooting and have some fun!
   

February 28, 2012

Manual Flash Made Easy

Without a doubt, one of the best features on the latest Speedlights has to be through-the-lens metering, aptly called iTTL on Nikons or E-TTL II on Canons. These flash units fire off a small pre-flash that tells the camera what the distance to the subject is and how much power is needed to get (what it thinks) is a good exposure. This is great when your distance is constantly changing, because it will calculate everything for you on the fly. But what do you do when you’re distance to your subject doesn’t change and you’ll be shooting a number of photos? If you want to get consistent results in that situation, most of the time manual flash will give you the best options. Keep this in mind, when you use manual flash, there are 4 main controls to adjust: 1 - Distance - from the light source to your subject, 2 - Power of your flash (including modifiers), 3 - Aperture and 4 - ISO.


For the most part, it makes pretty good sense why these 4 controls would affect manual flash exposure. You know that if you move your light source in closer you will get more light and you would have to change one or more of the controls - exposure, power or ISO to get a correct exposure right? Now some of you are already comfortable with off-camera flash and this tutorial wouldn’t be for you. But if you are one of those people who freeze up when thinking of adjusting those 4 controls yourself, I’m going to try to help you “make it click”.
Let me start by saying, if you don’t own an off-camera flash, I always recommend getting the best one available for your brand of camera. Granted it will cost more, but it will always pay off in the long run. Getting a speedlight that is cheaper limits you in features and its overall ability. With a Nikon it would be either the SB-800 or SB-900 or the new SB-910, and with the Canon (my own gear) it’s the 580 EX (I or II) Not only do they pump out a little more power and have some other nice features, but they also have a distance scale on the LCD panel (this will help you get consistent flash results) and we’ll need that for this tutorial. Some of you have probably wondered why that was even there in the first place?

I was recently checking out some photos that a friend of mine had taken at a small pageant / festival. The show was set on a stage inside of a local theater. Because people were in the seats all around him he couldn’t just get up and move around so he had to stay stationary and try to get the best shots he could from where he was. He already knew he couldn’t use additional lighting because the theater was filled with people and he couldn’t use bounce flash because the ceiling was about 40 ft high and black. So he attempted to use his speedlights TTL system, but he wasn’t getting consistent results. This is definitely a case where using your flash in manual mode can come to the rescue.
In this case, he knew he wanted some pretty good depth of field, around ƒ5.6 or better, and because it was fairly dark in there and he wanted to keep the quality good, he needed to use at least ISO 400 or higher. The key part of this was that he knew he was staying 20 ft. away the whole time.

Understanding Manual Flash = Distance, Power, ISO & Aperture
When trying to understand this, remember that the ISO and the Aperture are set on your camera; the Distance and Power are set on the flash unit itself.
  1. Right from the start we know we have four controls that we’re going to need to adjust. As long as you are shooting under your flash units max sync speed your shutter isn’t going to make any real difference, so we’ll set it at 1/125.
  2. We know we want some pretty good depth of field and we’ll set that at ƒ5.6.
  3. Now we’ll set our ISO at 400.
  4. Finally, we know we will be about 20 ft. away from the stage all evening.
Keep in mind our flash unit is going to be pointed straight forward all night, no bounce flash etc. Remember, you can’t tilt the flash head up or down or our distance scale disappears from the LCD screen. Now switch your flash to Manual exposure with the Mode button.
 
When you turn on your flash unit it will be set to whatever settings it was in the last time it was used in Manual exposure mode. Chances are it’s not set to 20 ft. We know we have to adjust the flash power to give us the distance we want, in this case, 20 ft. Remember; we just set the shutter speed, the aperture and the ISO.
On the Canon 580 EX I or II, tap the center button of that dial, and rotate the dial. (You will have to continually tap the shutter button to activate the distance readout on the back of the flash.) Now adjust the power of the flash until you get a distance reading of 20 ft.

On a Nikon SB-900, hit the button just below the ‘M’, which appears on the back of the speedlight and adjust it until you get a reading of 20 ft. Now to test it out, take a test shot of something around 20 ft. away from you. Because we’re using direct flash it won’t be the best lighting but we’re looking for consistent light. The shot will be well exposed, judging by how well you guessed the distance, and usually within a third stop or so. These little units are very accurate so if it isn’t on the money, you probably guessed the distance incorrectly.

Now at this point think about what you just did. First you set your cameras aperture and ISO then you reached the specific distance you wanted by adjusting your speedlights power setting. Try this out, change the aperture up or down and watch the distance scale change. The same thing would happen if we changed our ISO.

So what this tells us is that if we changed one of our controls (aperture / ISO / distance) we’d also have to change our flash units output to help us retain the correct exposure. Remember though, you might have to raise the ISO to get a fast enough shutter speed to control movements, but with a little practice this should become almost second nature. Try it out in different scenarios for yourself. Once you try this out a few times it will help make your speedlights more user-friendly. When you get away from using your camera’s pop-up flash and start using a larger flashgun, it gives you tons of new possibilities in lighting. I hope this helps you to better understand your equipment.
Remember, as always, keep shooting and have some fun!
 
© D. Gould Photography