skip to main |
skip to sidebar
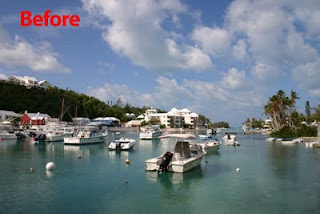
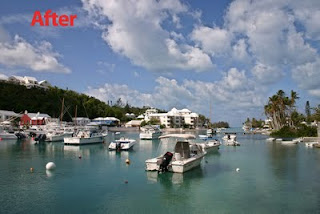 Have you ever had a photo of a nice sunset or a landscape
with some clouds in it, but when you open the photo up, you wish the
clouds had a little more punch to them?
I have a technique I use on
almost all of my photos with clouds in them to add some extra punch.
It’s a pretty quick process and the results make a nice improvement
almost every time.
The beauty of this technique is, all this is done on
its own layer so if want to
reduce the effects, you can just lower the opacity and if you still
don’t like the effect, you can trash the layer. Either way, its just a
few mouse clicks to adjust or correct your photo.
Have you ever had a photo of a nice sunset or a landscape
with some clouds in it, but when you open the photo up, you wish the
clouds had a little more punch to them?
I have a technique I use on
almost all of my photos with clouds in them to add some extra punch.
It’s a pretty quick process and the results make a nice improvement
almost every time.
The beauty of this technique is, all this is done on
its own layer so if want to
reduce the effects, you can just lower the opacity and if you still
don’t like the effect, you can trash the layer. Either way, its just a
few mouse clicks to adjust or correct your photo.
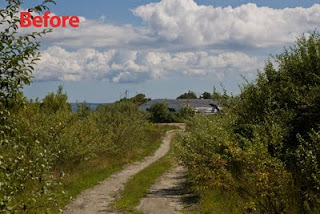
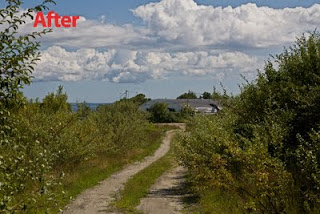 Grab one of your photos with a few clouds in it and follow along.
1. Whenever I work on a photo I always start by making a copy of my background layer (just in case) so click Cmd or Ctrl + J.
2. Now go up to the filter menu, click on it and scroll down to Other, then click on High Pass.
3. When the High Pass dialog box comes up,
slide the slider until your clouds look really sharpened
with lots of definition in your clouds. You don’t want to go overboard
because it will make your photo look really funky. Every photo will be
different so feel free to play around with your settings. When you’re
done tweaking it, click OK.
4. Now I desaturate my new layer, just
hold down Cmd + U or Ctrl + U to bring up your Hue and Saturation dialog
box, and then drag your saturation slider all the way to the left to
remove all the saturation.
5. Now go up to the top of your layers
panel and change the blend mode of our High Pass layer to either Overlay
or Hard Light, I usually prefer Hard Light myself.
Now depending on the photo you use, you might have to make some other minor adjustments to parts of your photo to either hide the sharpening effects or paint in the effects. This is actually quite easy to do using a layer mask and a nice soft brush.
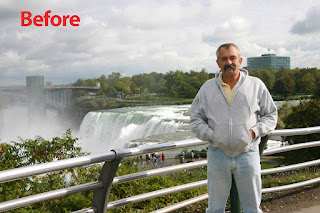
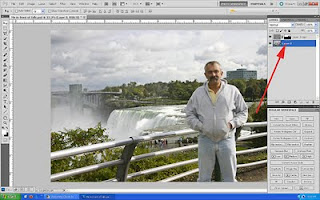
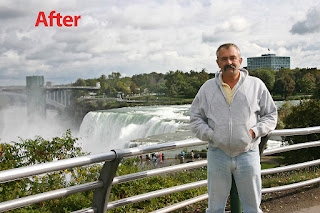 Most of the time it’s easier to use a black mask and
‘conceal’ all the sharpening, then I use a white brush to paint in the
sharpening on just my clouds. To get a black mask, hold the Alt key down
before you hit the mask button on the bottom of the layers panel. (the
mask button is the third one in from the left side of the panel) Make
sure your painting on the mask by clicking on the mask box. Remember, if
your effects are still a little too strong for your taste, just lower
opacity to your own liking. In this image, I painted in the effects with
a nice soft white brush. I use a Wacom tablet so I can paint with
various degrees of pressure, but you can do this with a mouse too.
Most of the time it’s easier to use a black mask and
‘conceal’ all the sharpening, then I use a white brush to paint in the
sharpening on just my clouds. To get a black mask, hold the Alt key down
before you hit the mask button on the bottom of the layers panel. (the
mask button is the third one in from the left side of the panel) Make
sure your painting on the mask by clicking on the mask box. Remember, if
your effects are still a little too strong for your taste, just lower
opacity to your own liking. In this image, I painted in the effects with
a nice soft white brush. I use a Wacom tablet so I can paint with
various degrees of pressure, but you can do this with a mouse too.
 When I get it where it looks good to me, I tap on the top layer to make it active and then hold down the Ctrl + Shft + Alt keys and tap the letter E to make a flattened copy of all my layers right on top of my layers stack. Then I hit Ctrl + A to select it, (you’ll see the marching ants around it) then hit Ctrl + C to make a copy of that layer.
Now go over to the File menu, and click New. This will open a new blank document that will be the same size automatically. Now just hold the Ctrl key and tap V to paste your copied image into your new document and you’ll see a new single layered file, then just save your new image as you like. Now you can either save the original file with your changes or just close it out.
When I get it where it looks good to me, I tap on the top layer to make it active and then hold down the Ctrl + Shft + Alt keys and tap the letter E to make a flattened copy of all my layers right on top of my layers stack. Then I hit Ctrl + A to select it, (you’ll see the marching ants around it) then hit Ctrl + C to make a copy of that layer.
Now go over to the File menu, and click New. This will open a new blank document that will be the same size automatically. Now just hold the Ctrl key and tap V to paste your copied image into your new document and you’ll see a new single layered file, then just save your new image as you like. Now you can either save the original file with your changes or just close it out.
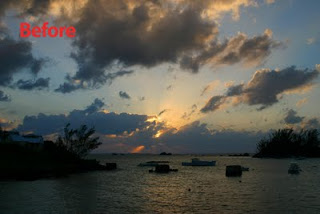
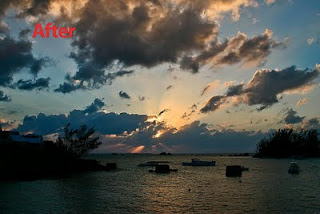 Now that you know this little technique you can use it
to add a little punch to your clouds in own photos. Don’t be scared to
try this with other photos also. It works great on images when you want
to selectively sharpen only specific areas in your photos or to add some
extra drama to your images. Try it yourself on a few images, the
results might amaze you!
Now that you know this little technique you can use it
to add a little punch to your clouds in own photos. Don’t be scared to
try this with other photos also. It works great on images when you want
to selectively sharpen only specific areas in your photos or to add some
extra drama to your images. Try it yourself on a few images, the
results might amaze you!
Remember, as always, keep shooting and have some fun!
 If you’re like me, I make the majority of my income from my so-called 9-5 job. Trouble is, it usually turns out to be more like 45-60 hrs a week and that severely cuts into my personal shooting time. You know the scenario, you get one day a week off and make plans to go shoot a particular location. But when the day comes, you can’t get there early enough or late enough in the day to catch the right light and just have to make the best of it.
Has this ever happened to you? Then maybe this article will help you too.
If you’re like me, I make the majority of my income from my so-called 9-5 job. Trouble is, it usually turns out to be more like 45-60 hrs a week and that severely cuts into my personal shooting time. You know the scenario, you get one day a week off and make plans to go shoot a particular location. But when the day comes, you can’t get there early enough or late enough in the day to catch the right light and just have to make the best of it.
Has this ever happened to you? Then maybe this article will help you too.
I was online one day reading a story about this
photographer’s personal experience shooting with a Variable Neutral
Density Filter. The author talked about using one of these filters and
being able to shoot wide open at f1.2 and maxing out his shutter speed
at 1/250, all at 2:30 in the afternoon! I had never heard of these
before. Variable Neutral Density filters are very handy in situations
where you need a slower shutter speed than what can be achieved by using
your camera’s lowest ISO and stopping down the lens. I found out that with these filters you could reduce the
light entering the lens from 1 to 8 stops (without affecting the color) just by
twisting the end of filter. In other words you would use it like you would a circular polarizer
lens and turn the end to let in more light or to block out light. In techie
terms that meant going from a ND2 all the way to a ND400 in a single filter! Check out this little clip to see how it works. Variable Neutral Density Filter
Well this started the wheels in my head spinning. I like to shoot anything with water; waterfalls, fountains, the ocean and I knew from experience that if you want your water smoothed out nicely, you usually have to be there really early (or on a very overcast day). Even timing it just right, most of the time you still had to use a 2 or 3 stop Neutral Density Filter so you that you could keep your open shutter long enough to blur your water without blowing out all your highlights at the same time. Then I thought about some other possibilities of where I could use these, like when I shoot a wedding and try to shoot the bride and groom in the mid-afternoon sun. Have you ever tried to minimize your depth of field at noontime, not an easy task huh? With these filters that problem is easily overcome, just dial down the density, pop it with a little flash, and presto - problem solved! Not only were they good for controlling depth of field and blurring motion, they were also useful for selective focus and Macro photography!
Well I always like a bargain and I decided to do a little research on these filters. What I found out was that these are getting really popular with people who shoot videos with their DSLR’s because they can shoot in the afternoon and still adjust their depth of field on the fly. I also found out that there were only a few companies that made these filters and they could get pretty expensive. Probably the best ones were put out by Singh-Ray and you could pay upwards of $400.00. But I continued to shop around online and came across a relatively unknown company called Light Craft Workshop, who manufactured the Fador Mark II - Variable Neutral Density Filters. For me, my favorite lenses are 77mm and I found out that I could save a couple hundred bucks and get one of these for $199.00. Don’t let that scare you, I found you could get a 58mm for as little as $109.00. Like everything else they come with mixed reviews and some people said that these types of filters could soften your images sometimes, but I really haven’t found that to be the case and I can always selectively sharpen if I feel the image needs it.
 Take a look at the two images. On the one without the Fader ND filter, you’ll notice how I’m blowing out my sky and the water isn’t even softened yet. That was shot at f/8 at 1/50 sec. For the other image I repositioned my tripod and used the Fader ND. This was shot also at f/8 but at 0.8 sec, about a 5 stop of difference. Keep in mind that these waterfall photos were taken a minute or two apart, at about 2 pm with the sun almost directly overhead. To create this image, I opened it up in Camera Raw, cropped it a little and pumped up my blacks. Then I added some fill light to the rocks with an adjustment brush. Lastly, I adjusted the clarity, vibrance and saturation sliders to my liking. But now it looks like I was there around dawn! Of course to finish it off I’d bring it into Photoshop and tweak it here and there, but take a look at what this filter can help you do. Maybe you could use one of these in your camera bag too? I hope this article gives you some new ideas. Fader Mark II Variable Neutral Density Filter
Remember, as always, keep shooting and have some fun!
Take a look at the two images. On the one without the Fader ND filter, you’ll notice how I’m blowing out my sky and the water isn’t even softened yet. That was shot at f/8 at 1/50 sec. For the other image I repositioned my tripod and used the Fader ND. This was shot also at f/8 but at 0.8 sec, about a 5 stop of difference. Keep in mind that these waterfall photos were taken a minute or two apart, at about 2 pm with the sun almost directly overhead. To create this image, I opened it up in Camera Raw, cropped it a little and pumped up my blacks. Then I added some fill light to the rocks with an adjustment brush. Lastly, I adjusted the clarity, vibrance and saturation sliders to my liking. But now it looks like I was there around dawn! Of course to finish it off I’d bring it into Photoshop and tweak it here and there, but take a look at what this filter can help you do. Maybe you could use one of these in your camera bag too? I hope this article gives you some new ideas. Fader Mark II Variable Neutral Density Filter
Remember, as always, keep shooting and have some fun!

 Have you ever had a photo of a nice sunset or a landscape
with some clouds in it, but when you open the photo up, you wish the
clouds had a little more punch to them?
Have you ever had a photo of a nice sunset or a landscape
with some clouds in it, but when you open the photo up, you wish the
clouds had a little more punch to them? 
 Grab one of your photos with a few clouds in it and follow along.


 When I get it where it looks good to me, I tap on the top layer to make it active and then hold down the Ctrl + Shft + Alt keys and tap the letter E to make a flattened copy of all my layers right on top of my layers stack. Then I hit Ctrl + A to select it, (you’ll see the marching ants around it) then hit Ctrl + C to make a copy of that layer.
 Now that you know this little technique you can use it
to add a little punch to your clouds in own photos. Don’t be scared to
try this with other photos also. It works great on images when you want
to selectively sharpen only specific areas in your photos or to add some
extra drama to your images. Try it yourself on a few images, the
results might amaze you!
Now that you know this little technique you can use it
to add a little punch to your clouds in own photos. Don’t be scared to
try this with other photos also. It works great on images when you want
to selectively sharpen only specific areas in your photos or to add some
extra drama to your images. Try it yourself on a few images, the
results might amaze you!


