Recently,
I was talking with another photographer about our different shooting styles and
we got to talking about lighting and off-camera flash. I enjoy putting together
images as opposed to just taking photos. What I mean is, when the conditions
aren’t just right, I don’t mind altering it to create the image in my mind. Usually
this can be as simple as just adding some extra fill light with speedlights or
reflector panels. In this post, I’ll try to take you through my process of getting
the shot I imagined. This day I didn’t have the luxury of light meters or
assistants. Hopefully this will show you how to get similar shots quickly and
easily without having to lug around a ton of gear.
About
a mile from my home is a local bird sanctuary that I like to visit. It has
miles of nice trails and lots of waterways and ponds. It also has a few
abandoned buildings, some old dead cars and even a small waterfall and a
covered bridge. To me, it’s a shooters paradise. I like to go walking / hiking
there often and always bring along a camera. For a long time I’ve wanted to get
a nice shot of a particular lagoon captured in early October, because I wanted the
trees in full bloom with all the Fall colors. I couldn’t find anyone to model this day, so I elected myself.
Trouble
is that in New England, once the leaves peak, you only have a few days before
they start falling. Because of some nasty weather, I missed the peak by a few
days and a lot of the leaves had blown off the trees or had already fallen. I decided to shoot it anyway
and I got my gear ready; a couple of light stands, a few speedlights with remotes,
a shoot thru umbrella and of course my camera and trusty tripod. Also, I knew
that I wanted to blend in a little so I wore some fall colors and put on an
orange shirt and some tan shorts. A little planning can change everything.
Check out the before and after shots, labeled
Original Scene and Finished Copy. Luckily I got some pretty decent clouds that
day, although I did have to punch them up a bit in Photoshop later on. In a shoot like
this I have a system that works for me. I usually like to shoot tethered but
this day I wanted to rely solely on my LCD and the histogram for creating this
tutorial.
I
knew I wanted some good depth of field so I started off at ƒ / 11.
I switched my camera to aperture priority and then
set it to ƒ /11, pushed the shutter
button halfway to see what the camera wanted for a shutter speed, and then switched
over to manual mode and used those settings as my starting point.
Next I needed to see
what I’d get without any flash and I took a test shot of me on the rock. See the No
Flash shot. These days all cameras have a self-timer and I set mine at 5
seconds so I could get in my shots. By looking at my LCD I could see I needed
to add quite a bit of light on me. I set up my first bare speedlight on a stand
to my left and took another test shot. I usually stretch my arms out straight
and make that my distance between me and my main light. For me, that’s roughly
6 ft. away. Then I switch my first flash to manual and set it at ¼ power as a starting
point.
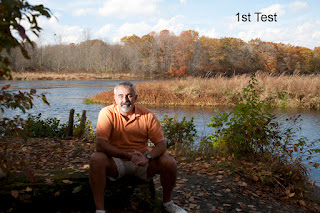 As you can see in the
1st Test Shot, I needed a wider spread of light so I re-adjusted the
speedlight and added a shoot thru umbrella. Then I could easily move my light
stand or adjust my speedlights power up or down to compensate.
Next, I
put a light stand in the place where I would sit and auto focused on it. See the Focus
Shot. When I achieved focus, I switched the
lens off of auto-focus so all my shots would be set.
After looking at that
shot on my LCD, I saw the shadows under my leg, behind my arm, and on the sides
of my face. See the 2nd Test Shot.
I knew I’d have to add another speedlight into
the mix on my right hand side to lessen up those shadows. I set my second light
about 8ft. away, bare bulb, and set it at ¼ power. See the Add Second Light
shot.
As you can see in the
1st Test Shot, I needed a wider spread of light so I re-adjusted the
speedlight and added a shoot thru umbrella. Then I could easily move my light
stand or adjust my speedlights power up or down to compensate.
Next, I
put a light stand in the place where I would sit and auto focused on it. See the Focus
Shot. When I achieved focus, I switched the
lens off of auto-focus so all my shots would be set.
After looking at that
shot on my LCD, I saw the shadows under my leg, behind my arm, and on the sides
of my face. See the 2nd Test Shot.
I knew I’d have to add another speedlight into
the mix on my right hand side to lessen up those shadows. I set my second light
about 8ft. away, bare bulb, and set it at ¼ power. See the Add Second Light
shot.
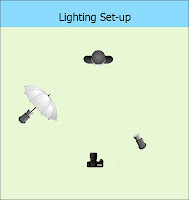 Check out my Lighting Set-Up diagram to see how I placed my gear.
Now I still had some
shadows to mess with but by rearranging the speedlights a few more times and
taking some test shots, I got to a place where I got the least amount of
shadows and I knew I could easily fix those in Photoshop afterwards. See
the Tweaking Photo.
Check out my Lighting Set-Up diagram to see how I placed my gear.
Now I still had some
shadows to mess with but by rearranging the speedlights a few more times and
taking some test shots, I got to a place where I got the least amount of
shadows and I knew I could easily fix those in Photoshop afterwards. See
the Tweaking Photo.
I could also see from my LCD
that I wanted a darker sky. I dropped the ambient a little more by raising my
shutter speed and adjusting the power of my speedlights until I was happy with the
light on me. I knew I was going to punch up my colors on the trees in the background and on the
sky some more in post so it was time to pack up and head home to edit and put
the final touches on my shots.
Because
I was only using my 3” LCD that day and mainly paying attention to the lighting
on me, I didn’t notice the other stuff on the rock beside me until I opened the shots on my
PC at home. You’ll notice the plastic bag and the white tube socks on the rock. Just for
the record, I wrap my speedlights in tube socks to help protect them in
transport.
The final steps were
relatively easy. After downloading the shots, I opened up the last shot I got
after tweaking my lights, duplicated the layer, and then removed the stuff on the rock beside me
with the clone stamp and content aware fill. See the Remove Clutter shot.
If you look close you’ll
notice on the Remove Clutter shot, I still had a few more shadows that I had to
remove (above and below my hands). So I duplicated that layer and edited the shadows out. See the Remove
Shadows shot.
Next,
I duplicated that layer because I needed to darken the tall grass and the
ground in front of me and I grabbed the burn tool to tweak those areas.What
I like to do when dodging and burning is to add a new layer, fill it with 50%
gray, switch it to Overlay mode and then dodge and burn on that layer, all
non-destructively……Nice huh?
Pressure sensitivity on my Wacum tablet helps with that. I still wanted to darken my sky a little more
so I used a new Gradient adjustment layer for that. Here
I press and hold the Shift, Control and Alt buttons and tap the E key to create a flattened version
of all my layers on top of the layer stack, then proceed to the next step.
Finally, I punched up the saturation on the
island and the trees in the background with the sponge tool. I made sure it was set to saturation mode with the vibrance box checked and brushed it in until it looked
good to me. Keep in mind, all my adjustments in post are made on adjustment
layers or separate new layers so I can always go back and change things if I want. That's a huge reason I’m a huge fan of
Smart Objects and Filters. Plus all my work is shot in RAW on my camera. This post wasn't meant to be a lesson in Photoshop, so please bear with me.
Because
I’ve done this a few times, the whole shooting time was about a half hour or
so and counting the practice
shots, I probably took somewhere between 50 – 75 shots total.
If I had a model, that time would be even less because I wouldn’t have had to
jump up from the rock and move the light stands or adjust the power on my speedlights after every shot. In the end, I probably spent
another half hour or so in Photoshop.
Obviously, your first time will probably
take you a while longer, but with a couple speedlights and some practice, you
too can make great shots under all conditions. I hope you enjoy this article
and you get a few useful tips out of it.
Remember,
as always, keep shooting and have some fun!
 This
is just a short article / review on the Phottix Odin Wireless TTL Trigger Set.
I’ve been using off-camera flash with various wireless flash triggers for over
ten years now, mostly for fill flash type scenarios at weddings or on
occasional portrait sessions. Every pro or semi-pro photographer has known that
for years the Pocket Wizards were always the cream of the crop. For my shooting
style they tended to be on the expensive side, but they were ultra-reliable and
also one of the first units to offer full TTL functions.
This
is just a short article / review on the Phottix Odin Wireless TTL Trigger Set.
I’ve been using off-camera flash with various wireless flash triggers for over
ten years now, mostly for fill flash type scenarios at weddings or on
occasional portrait sessions. Every pro or semi-pro photographer has known that
for years the Pocket Wizards were always the cream of the crop. For my shooting
style they tended to be on the expensive side, but they were ultra-reliable and
also one of the first units to offer full TTL functions.


