Here’s a problem I see so many people having when they try
to make prints from their home PC, maybe this has happened to you?
You go out shooting to an event or a nice location and you
take a photo that you just have to print up. You bring it into Photoshop and
make all your little changes to get it to look just right. But then you send it
to your printer and it comes out of your printer way darker than you see it on
your monitor?
Don’t freak out, it isn’t your printers fault. It’s actually because our monitor screens are backlit and our paper isn’t. So when you try to print photos, they will generally always look darker than they did on screen.
Don’t freak out, it isn’t your printers fault. It’s actually because our monitor screens are backlit and our paper isn’t. So when you try to print photos, they will generally always look darker than they did on screen.
Here’s what I do to solve this problem. Right when you’re
done tweaking your photo, make a duplicate of your background layer. Sometimes
you might have a bunch of layers, if you do, make sure you top layer is
selected and hit Ctrl+Alt+Shift keys and tap the letter E. This will put a
flattened copy of all your layers on top of the layers stack. Now tap Ctrl + J
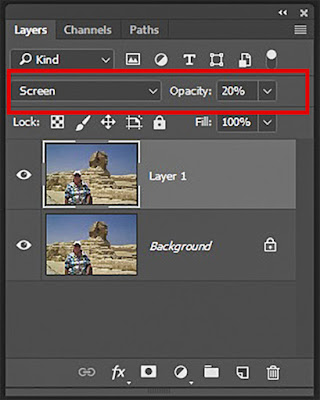
to make a copy of that layer and change that layers blend mode from Normal to
Screen. This will make the whole image way too bright. Next just lower the
Opacity of the Screen layer to 20% and make a test print. I say 20% because that’s
what works on my printer. Yours may vary, so if yours is still too dark, try increasing
it to 25% and so on until you find your printers sweet spot. To make things even
easier, I created an Action to do this and assigned one of the F keys on top of
my keyboard to do this with one button.
I hope this tip helps you out. Remember, as always, keep shooting and have some fun!


