These days just about everyone is using a smart phone and are taking more photos and videos than ever with them because they always have a camera with them. Makes sense right? Unfortunately, most of these gadgets only shoot in JPEG mode and often times these images need to have the white balance adjusted. Here is a good way to quickly get an accurate white balance in Photoshop. This is just one of methods in my bag of tricks. Try it for yourself on one of your JPEG’s or a difficult RAW file. To make it even easier you could create an Action for it, but that’s another tutorial. I hope you find this tip helpful.
1. Open an image
2. Create new blank layer and fill it with 50% gray. To do
this go under the Edit menu and choose Fill or use the shortcut Shift >
Backspace and choose 50% gray from the drop down menu. 3. Change the new layers
blend mode in the layers panel to Difference.
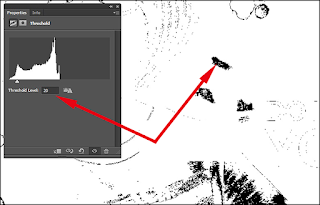
4. Create a new Threshold
Adjustment layer from the Layer dropdown menu or by clicking the circle shaped button
on the bottom of the Layers Panel. When you do this, you should see a totally black screen with
a Properties dialog box. See image.
Tip: I use Actions
all the time for repetitive things like this and this is one of the times creating
an Action would come in handy. You could
create one to do the first 4 steps and stop automatically. Want to make it even
better? Assign a keyboard shortcut or an F key to it to save you even more
time.
 5. Drag the triangle at
the bottom of that dialog box all the way to the left until your image turns completely
white. Now slowly slide it back to the right side until black blotches appear
and stop. I usually stop at around 15 – 25% or when I get a large enough area
to leave a Color Sampler marker.
Every image is different. Sometimes you can
skip step 5 because you’ll have a nice gray point to set your white balance,
like on the boy’s camera body.
6. The Color Sampler
tool is located underneath the Eyedropper tool on the toolbar in the flyout menu.
After you select that you need to leave a marker. To leave a marker, press and
hold the Shift key and click on a black area on your Threshold Adjustment
layer.
7. Now you can delete the Adjustment layer and the 50% Gray layers and click on your main image layer to activate it.
8. Add a Curves or a
Levels Adjustment layer. I usually use a Curves layer myself and click on the
middle eyedropper on the left side of the Properties panel to make it active.
 9. Finally, click the
Color Sampler point marker you created and instantly your color is fixed, nice
huh?
9. Finally, click the
Color Sampler point marker you created and instantly your color is fixed, nice
huh?10. Now you can delete that layer and remove your marker. To do this, activate the Color Sampler tool again and then click the Clear button up on the task bar. I hope this tutorial helped you.
Remember, as always, keep shooting and have some fun!


